Hello friends,
Please do check the events list at the right side of the blog and also send in your entries for CFK - WWF event hosted here. Today is the last day.
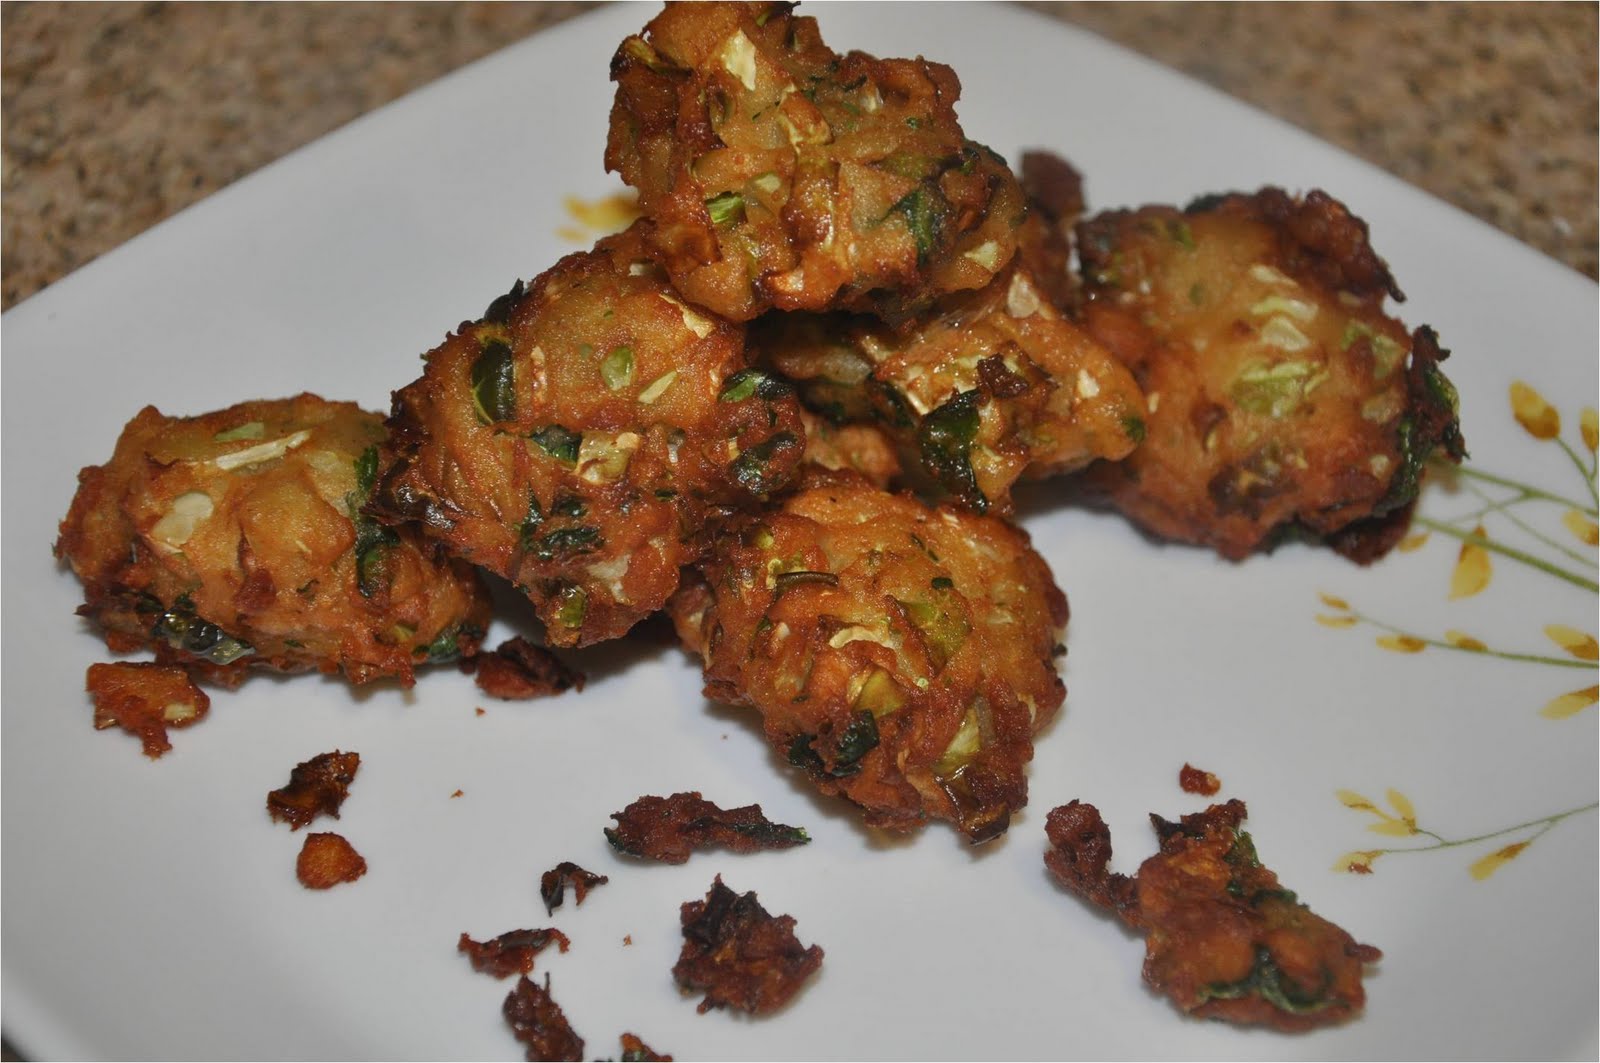
Hope you all had a wonderful weekend. I did, enjoyed some sun and got sun burns as well. Sorry for keeping you all wondering as to what I did with my sprouted moong posted in my last post. So, here is what I did. I made these yummy looking tikkis out of it. Hope you all will like it.
These tikkis are so healthy that you can even serve them breakfast and don't have to feel bad about having tikkis at all :)
Ankurit Moong ki Tikki - अंकुरित मूंग की टिक्की (Sprouted Moong Patties)
Ingredients
Ankurit Moong (Sprouted Moong) - 2 cups (you can use regular overnight soaked green moong as well)
Hari Mirch (Green Chillies) - 2
Adrakh (Ginger) - 1 inch piece
Lal Mirch (Red Chilli) Powder - 1/2 tsp
Dhaniya (Coriander) Powder - 1/2 tsp
Jeera (Cumin) Powder - 1/2 tsp
Bread Crumbs - 1/2 to 3/4 cup
Onions - 3/4 cup finely chopped.
Salt - as per taste
Preparation
- Grind everything except bread crumbs and onions coarsely or fine per your liking. Add as little water as you can as you don't want it to be runny.
- Add onions and 1/2 cup bread crumbs to it and mix well. Add more bread crumbs to make it more binding so that you can make a ball out of the mixture and form a tikki.
- Take a non stick hot griddle and fry these tikkis with as little oil as you can. I like to use zero calories oil sprays for this kind of frying. Alternatively, for those of you who have appam pan, can try it in that. I have never tried that method, but I am sure, it will be lovely.
- Fry till they are golden brown on both the sides till they are golden brown. Remember, this is ground uncooked moong, so it should be fried at low heat for longer period than usual aloo tikkis.
Serving
Serve them with some favorite chutneys or sauce or just plain old dahi.
I am sending this to MLLA # 23 event hosted by Susan and Green Gourmet event of Preeti Kashyap.


That's all for now. Take care till next post.
Hello friends,
Just sending a nice visual treat your way !!! A recipe of this ingredient follows soon :)
Sprouted Moong - अंकुरित हरा मूंग
Till next post, take care !!!
Hello friends,
This is one of our most family favorite, can be eaten anytime, cooked anytime kind of dish. Sometimes my husband and son will simply not eat kadhi without pakodas, so this is very frequently made dish. Don't worry about the measurements, because this is how much we usually make as I try to make it for 2 meals usually as everyone wants to eat the leftover kadhi, so always a little more :)
Normal prepping time for this is about 10 minutes and cooking time is about 20 minutes, isn't that quick, I mean kind of quick?
Rajasthani Pakoda Kadhi - राजस्थानी पकोड़ा कढ़ी (Chickpea and Cilantro Fritters in Yogurt/Chickpea Gravy)
Ingredients
For Kadhi (Gravy)
Dahi (Yogurt) - 2 cups
Water - 2 cups
Besan (Chick Pea Flour) - 2 tbsp
Dhaniya (Coriander) Powder - 1 tsp
Jeera (Cumin) Powder - 1 tsp
Haldi (Turmeric Powder) - 1 tsp
Amchur (Dry Mango Powder) - 1 tsp
Salt - as per taste
For Tempering of Kadhi (Gravy)
Oil - 1 tbsp
Rai (Mustard Seeds) - 1 tsp
Jeera (Cumin Seeds) - 1 tsp
Heeng (Asefoetida) - a pinch
Lahsan (Garlic) - 4 big cloves
Adrakh (Ginger) - 1 inch piece
Hari Mirch (Green Chillies) - 3-4, finely sliced
For Pakoda (Fritters)
Dhaniya Patti (Cilantro) - 2 cups
Besan - 1.5 cups
Lal Mirch (Red Chilli) Powder - 1/2 tsp
Salt - as per taste
Preparation
For Kadhi (Gravy)
- Mix everything under "For Kadhi" well in a bowl such that there are no lumps left.
- Now, take a deep and thick bottomed pan and add first 4 items under "For Tempering of Kadhi".
- Once the seeds start spluttering, add the remaining ingredients under "For Tempering of Kadhi".
- When nice aroma of ginger/garlic starts coming, add the yogurt mix in it and mix continuously till the mix starts boiling (A tip here, always take the yogurt out of the fridge at least an hour before you make this so that yogurt is in room temp and doesn't take very long in boiling). This constant stirring step is very important as if not done properly, the yogurt will curdle.
- Once the kadhi starts boiling, simmer the gas for 4-5 minutes so that it gets cooked well (you can really smell a nice aroma, once it is done, so you will know..lol).
- While this is cooking, make pakodas :)
For Pakoda (Fritters)
- Mix all the ingredients with just enough matter to make it into a very thick batter. It should be very similar to cookie batter (very thick), add besan less or more depending on it.
- Heat enough oil in a pan to deep fry these pakodas.
- Once the oil is hot enough, add teaspoonfulls of batter in oil and let them fry for 1-2 min. or so till the pakodas become a nice golden brown color.
- Drain them on paper.
- If you like the pakodas to be crispy when you eat them in kadhi, do not add them to kadhi till it is ready to be served or they will become very soggy.
Serving
Right 5 minutes before serving, add pakodas to kadhi and serve it with warm rotis or my favorite warm white rice :)
This can also be made without pakodas. If you plan to just plain kadhi, do garnish kadhi with cilantro or even better, with some crushed kasoori methi (dry fenugreek leaves).
I am sending this to MLLA # 23 event hosted by Susan.
That's all for now. Take care till next post.
Hello friends,
This is a yummy Zucchini pachhadi (Chutney) recipe from one of my very dear friend, Rajyalakshmi. I love you Raji for teaching me this wonderful chutney. My husband (who usually doesn't like chutneys) and I simply loved it when she brought it for us. I made it last night and it came out really well :)
This is a very nice use of zucchini which so far I only used in curries and dal. It is in season, so very quick and simple, about 5 min. of prep time and 10 more min. of cooking the veggie and grinding it, so real quick.
Zucchini Pachhadi/Chutney
Ingredients
Zuchhini - 4 cups (this will yield about 2 cups chutney)
Haldi (Turmeric Powder) - 1/2 tsp
Salt - as per taste
Tamarind - 1 lemon size ball (soak in hot water for 10 min.)
Meetha Neem (Curry Leaves) - 8-10 leaves roughly chopped
For Tempering
Chana Dal - 1 tbsp
Urad Dal - 1 tbsp
Rai (Mustard Seeds) - 1 tsp
Jeera (Cumin Seeds) - 1 tsp
Lal Mirch (Whole Red Chillies) - 4-4, broken in pieces
Lahsan (Garlic Cloves) - 4 (I made them rough 2-3 pieces of each garlic, as they will be ground anyways, so no need to fine chop them)
Oil - 1 tbsp
Preparation
- Peel the Zucchinni and cut into small pieces.
- Take a pan, add oil.
- Once it is hot add everything under "For Tempering" and fry it till nice aroma starts coming and seeds start spluttering.
- Add chopped zucchini, salt and turmeric and cook it until it becomes tender (about 5 minutes).
- Cool it and grind along with tamarind pulp (I used seedless version, so I added the tamarind as it is and did not really took the pulp out) and meetha neem to a nice paste.
- No water is needed unless you really want it to be runny (as tamarind has some water and zucchini by default has some water).
Serving
Serve it with hot rice and a dollop of ghee or with any idli/dosa or I have used it as a spread on bread/roti wrap as well. So, get creative :)
I am sending it to Twenty-20 event of Niloufer.

Also, sending this to Think Spice: Think Tamarind event of PJ.

That's all for now. Till next post, take care :)
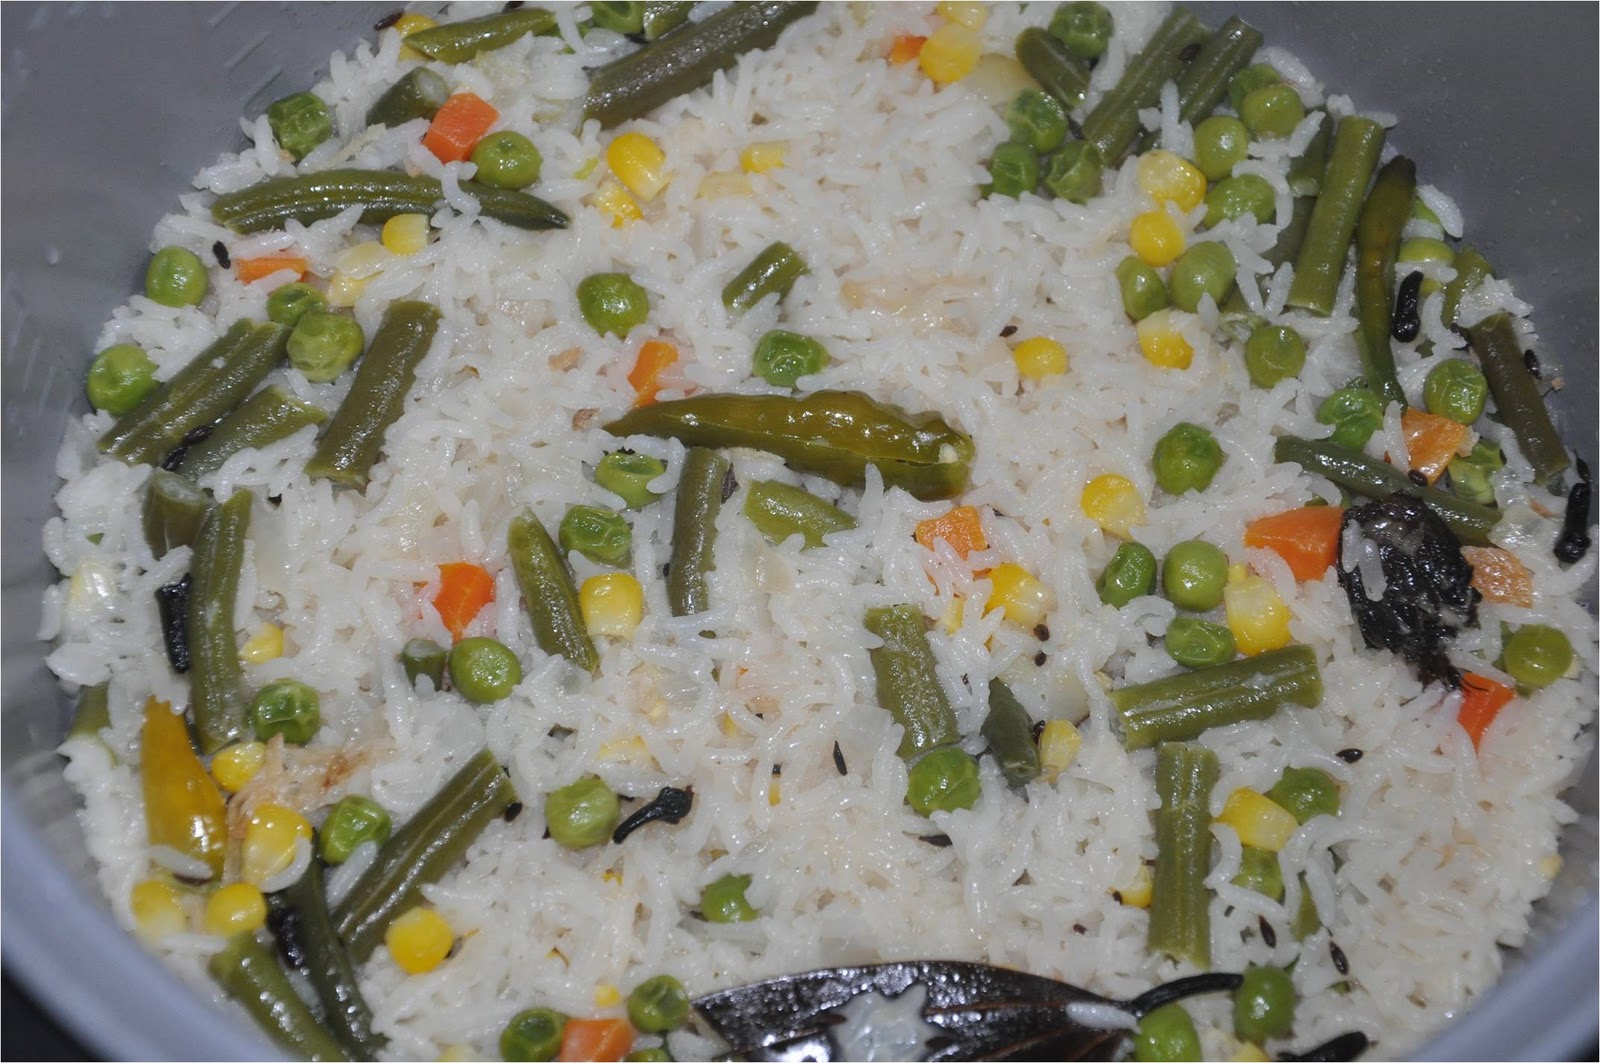
Hello friends,
Here is what we just had for lunch. An amazing and rich looking recipe that I had bookmarked a while ago from Ruchika Cooks. Today was the day when I prepared it finally. It is called Coconut Milk Vegetable Rice Pilaf. I don't think the picture does justice to how rich and literally creamy (as creamy a rice dish can be) it was. I have never cooked rice with coconut milk. For that matter, I have only cooked once before with coconut milk, so don't have much experience.
Coconut Milk Vegetable Rice Pilaf
Ingredients
White Rice - 1 cup (wash and soak in water for about 10 min.)
Coconut Milk - 3 cups (I used canned version)
Onion - 1 cup, finely chopped
Mixed veggies - 1 cup (I used frozen)
Ginger - 1 inch piece, grated
Garlic - 3 cloves, minced
Green Chillies - 4 slit in the middle (not all the way, just half way)
Bay Leaf - 2 small leaves
Cinnamon - 2 small pieces
Black Cardamom - 1
Cloves - 4-5
Cumin Seeds - 1 tsp
Mustard Seeds - 1 tsp
Salt - as per taste
Oil - 1 tbsp
Preparation
- Take a pan and add oil to it.
- Once oil is hot, add mustard seeds, cumin seeds, bay leaf, cinnamon, black cardamom, cloves to it.
- When nice aroma starts coming from it, add ginger and garlic and fry for 30 seconds.
- Add onion and green chillies to it and fry till it is translucent.
- Add veggies and fry for 2-3 min.
- Add drained rice to it along with salt and fry for another 2-3 minutes.
- Now, transfer this to a cooker (if using rice cooker or pressure cooker) and add coconut milk, mix well and cook till rice is well done.
Serving
This can be served with a nice spicy side dish as the rice is not very spicy by itself. My son had it just like that as it was just perfect for him and I had it with mouth watering spicy zucchini chutney given to me by a very dear friend of mine. I will be posting that recipe very soon.
The only thing I changed from this dish was I added 2 cups coconut milk and 1 cup water (as I ran out of it), but just because of this change, I am sending this to Blog Bites: Adaptation event of Nupur.
I am so happy to tell that SS has shared a wonderful award with me and I need to share my favorite pic for this. Thanks you very much to think of me and sharing this with me. I would like to in turn share this with all my blogger friends who visit and encourage me every day :)
I have many favorite pics, but here is one of the best. It's that of Lake Tahoe from an elevation.
That's all for now. Take care till next post.
Hello friends,
I got this beautiful and delicious award from Divya. Thanks Divya for thinking of me and passing this award to me :)
Take care friends.
ello friends,
So, something good came out of something that didn't exist. OK, sorry that is not very helpful. Here it is, I wanted to make this chilling Badam (Almonds) milkshake this afternoon for evening time, but just happened to notice that I ran out of badam, doesn't happen very often, but today was one of theose days. Anyways, so, I am like ok, so what else do I churn into my milkshake, so I came up with this idea of mixing kaju and pista, so here you go with the milkshake.
Kaju aur Pista Ki Thandai - काजू और पिस्ता की ठंडाई (Cashew and Pistachio Milk Shake)
Ingredients
Milk - 1 cup
Kaju (Cashew) - 1/4 cup (Soak in warm water for 1 hour)
Pista (Pistachio) - 1/4 cup (Soak in warm water for 1 hour)
Saunf (Fennel Seeds) - 1 tbsp
Condensed Milk - 3/4 cup
Kesar (Saffron) - few strands soaked in little bit of warm milk
Ilaichi (Cardamom Powder)
Ice Cubes - 1 cup
Preparation
- First grind kaju, pista and saunf in a blender
- Then mix the rest fo the ingredients and blend them till a nice froth forms on the top.
Serving
Serve it chilled either at breakfast or snack time or any other time you feel like having a milkshake. If you use low-fat or skim milk instead of milk and instead of using condensed milk, simply use regular sugar, you can drink it anytime guilt free :) But, the real taste is in drinking the way it is here... lol
I am sending this for Thanda Mela event of Srivalli, Show me Your Smoothies event of Divya.


That's all for now, rest later.
Hello friends,
A Wonderful Gift
I received this wonderful gift from an amazing blog friend Champa. Few days ago, she said she will be giving away a book and little did I know that I will one of the receipients. Right now, my son (5 yr old) is scanning through the pics and deciding what he would like me to make... lol :)
Butter Murukku - माखन मुरुक्कू
OK, so, this is my son's absolute favorite in snack along with Nimki. I wanted to try an easy version, so went with Butter Murukku as described in the link. I following the exact same procedure as mentioned in the recipe and what a result, my son absolutely loved it and wanted me to experiment with different moulds in the murukku maker. Yes, finally I borrowed it from one my dear friends Raji and tried this version as I lost mine during one of my moves. Next time I go to India, this is something I HAVE to buy and get back along with few other gadgets.
Now that I tried this, I want to experiment with some other varieties of murukku (meaning different combination of ingredients). And, my personal absolutele favorites is that of urad dal (Skinned Split Black Lentils). My best friend's mother makes them such that they will melt in your mouth. I have to somehow get that recipe and try it out.
Till my next experiment with murukku enjoy these and take care.
Hello friend,
Here is my tried and tasted recipe from Sailu's Kitchen. It is called Kaju Paneer - काजू पनीर. The moment I had laid eyes on this while looking through her site for T & T last month, I had bookmarked it and knew I will be making it soon. So, here it is. This is what we had for dinner tonight.
I am not going to post the recipe, as I followed it very religiously except for adding malai at the end (as I didn't have any at home). So, please go to the link I pasted above to check the recipe and the wonderful pic she has posted. It is way better than mine. But, I can vouch you for this, the taste of this curry was divine in taste. A lovely recipe of paneer I learnt, Thank you very much Sailu for this.
That's all for today. Till next post, take care.
Hello friend,
Another entry for my CFK - WWF event. This will be a good dessert to make which of course includes whole wheat and also the healthy apple.

Aata aur Seb ka Halwa - आटा और सेब का हलवा (Whole Wheat Flour and Apple Pudding)
Ingredients
Aata (Whole Wheat Flour) - 1 cup
Seb (Apple) - 1 cup grated
Sugar - 3/4 cup (increase or reduced based on your liking. In usual halwa, I add 1 cup sugar for 1 cup flour)
Ghee (Clarified Butter) - 1/2 cup
Hot Water - 1.5 cup
Mixed Nuts/Raisin - For garnishing
Preparation
- Lightly roast mixed nuts and raisins (whatever you are using to garnish) in a tsp of ghee.
- Take the ghee in a pan.
- Roast aata till nice aromas come out of it.
- Add grated apple to it and mix well and fry for about 1 more min.
- Add water little by little and mix well.
- Once, water is all incorporated, add sugar and garnishings and mix well. (Remember, this halwa will look very soft and loose once finished, but after 5 min or so after removing from heat will be of great shape).
Serving
Serve it as a dessert.
Sending this to Celebrate Sweets - Halwa event of Nivedita.
That's all for today. Till next post, take care.
Hello friends,
A complete meal and a family favorite. When I made it over the weekend, my husband complained that I started making it less frequently than I should. So, it has to be done more often now. We used to eat it every Sunday without fail.
This is what many of you may call as one-pot-meal. It has everything that one would eat at lunch/dinner except fruits or deserts :)
I like to use a pressure cooker for this though this can be made in an open pot with a lid, but that consumes more energy and takes longer time. Another thing I want to mention is that my mom makes a slightly different version of this in which she likes to dry roast all dals before cooking them. That has it's own wonderful taste. Feel free to try both versions. I just get too lazy to dry roast the dals. This recipe takes me about 30 minutes from start to finish, including prep time.
Mili Juli Dal aur Sabziyon Ki Masala Khichdi - मिली जुली दाल और सब्जिओं की मसाला खिचड़ी (Mixed Lentil and Veggie Rice)
Ingredients
Toor/Arhar Dal - 1/4 cup
Chana Dal - 1/4 cup
Masoor Dal - 1/4 cup
Moong Dal - 1/3 cup
White Rice - 1 cup
Adrakh (Ginger) - 1 tbsp grated (grated really works well for this recipe, though feel free to add finely chopped as well)
Hari Mirch (Green Chillies) - 2-3 (I used 1 tsp red chilli powder instead as my husband and son don't like when chillies come in their bites)
Mix veggies - 1 cup (I use frozen mix of peas, carrots, corn and green beens)
Onion - 1 cup thinly sliced
Tomatoes - 1 cup sliced or chopped, as you like
Water - 8 cups
Masalas
Haldi (Turmeric Powder) - 1 tsp
Lal Mirch (Red Chilli) Powder - 1 tsp (only if you are not using green chillies)
Dhaniya (Coriander) Powder - 1 tsp
Jeera (Cumin) Powder - 1 tsp
Garam Masala - 1 tsp
Salt - as per taste
Tempering
Oil - 1 tbsp
Jeera (Cumin Seeds) - 1/2 tsp
Rai (Mustard Seeds) - 1/2 tsp
Saunf (Fennel Seeds) - 1/2 tsp
Methi (Fenugreek Seeds) - 1/4 tsp
Kalaunji (Nigella Seeds) - 1/2 tsp
Tej Patta (Bay Leaves) - 2-3
Dalchini - 2 one inch pieces
Badi Ilaichi (Black Cardamoms) - 1
Laung (Cloves) - 4-5
Preparation
- Wash and soak rice and dal together or seperately (it doesn't matter, I mix and wash and soak them).
- Take a pressure cooker and add oil to it.
- Add everything under tempering and let the seeds splutter and nice aroma of whole masalas start coming out.
- Add grated ginger and hari mirch to it and let it fry for 30 seconds.
- Add onions and fry till they become translucent.
- Add all washed and cut veggies and fry for 2 minutes.
- Add tomatoes and all the masalas and fry for another 2 minutes.
- Add washed rice and dal, mix well and fry for another 2 minutes.
- Add water to the cooker, mix well and cover and let it cook for 15-20 minutes (depending on how soft you like your khichdi to be)
- Once you switch off the gas, let the cooker cool down completely and then open the lid.
- Remove the whole spices (laung, badi ilaichi and dalchini) and tej patta from the khichdi, if you do not like that to come in your spoon when eating.
- At this step, you can either choose to add ghee here before serving to the entire khichdi (use the quantity based on your preference) or reserve it while serving.
Serving
Serve it with a dollop of ghee and with dahi, papad and/or pickle. I sometimes like to eat it without anything as it is yummy just like that.
I am sending this to MLLA # 23 event of Susan.
Hello friends,
Here is my first entry to CFK - WWF Event :)
Kele Ka Malpua - केले का मालपुआ (Whole Wheat Banana Pancakes in Sugar Syrup)
Ingredients
For Batter
Aata (Whole Wheat Flour) - 1/2 cup
Maida (All-Purpose Flour) - 1/2 cup
Sooji (Semolina) - 1/4 cup
Banana - 1 big one mashed well
Milk - 1.5 cups (add more or less depending upon on how thick it looks)
Sugar - 1/2 cup
Kishmish (Raisins) - 1 tbsp
For Sugar Syrup
Sugar - 1.5 cups
Water - 1.5 cups
For Garnishing
Pistachios
Preparation
- Mix everything under For Batter well. Add milk little by little after adding 1.25 cups by eyeballing it. The batter should not be very runny, it should be little bit thicker than usual cake/dosa batter. Basically, when you pour a ladle in oil, it should hold shape of a circle and not run haywire.
- Keep it aside for 4-5 hours.
- Prepare sugar syrup of 1 string consistency by mixing the ingredients under For Sugar Syrup.
- Keep it warm (not hot) when you are ready to fry malpuas.
- Take a small pan and add enough oil to be able to fry malpuas (feel free to add a lot of oil, but that is not needed).
- Once the oil is hot, slow the fire and keep it that way as we want to fry these malpuas in slow heat (not all the way slow, but not very high either).
- Now, take a ladle full of batter (i would say about 1/4 to 1/2 cup) and try to pour it in a circular form in the middle of your pan (or wok whatever you are using). Make sure, it is not too thin, or else it will break apart. Let it be thick like a thin cookie thickness.
- You will notice that it will slowly come up. Let it cook on both sides for abour 1-2 min (depending on how hot your oil is).
- Please do not turn the malpua multiple times, so remember you flip only once.
- Once it is golden brown, drain it properly and dip it directly in the sugar syrup (if your malpua has lot of excell oil, please feel free to drain it first in the paper towel).
- Let it be in the sugar syrup for about 5-10 seconds and remove it.
Serve
Serve it warm (warm is good as it has syrup or else the syrup will crystallize) garnishing with some sliced or chopped pistachios.
A wonderful and easy dessert it is. Though, I like to eat it any part of the day. One more variation I do is, sometimes, not put them in sugar syrup and simply eat them as it is, in which case, please feel free to increase the sugar quantity of the batter. My husband likes the one without syrup better :)
That's all for now. Take care till next post.